
ここでは UI Toolkit を使用したもっとも簡単なアプリケーションの作成方法から動作確認までを解説します。
開発には PSM SDK 付属の PSM Studio を使用します。 事前に 開発環境の設定 を参照して PSM Studio の開発環境を設定してください。
Contents
PSM SDK 付属の PSM Studio には、 UI Toolkit アプリケーションを作成するためのプロジェクトテンプレートが用意されています。このテンプレートを使用してプロジェクトを作成します。
制限事項
現在、UI Toolkit アプリケーションのテンプレートは準備中です。以下の手順で UI Toolkit アプリケーションの プロジェクトを作成してください。
PSM Studio を起動します。
PSM Studio のメインメニューから [ファイル] ([File]) > [新規] ([New]) > [ソリューション...] ([Solution...]) を選択してください(図1)。
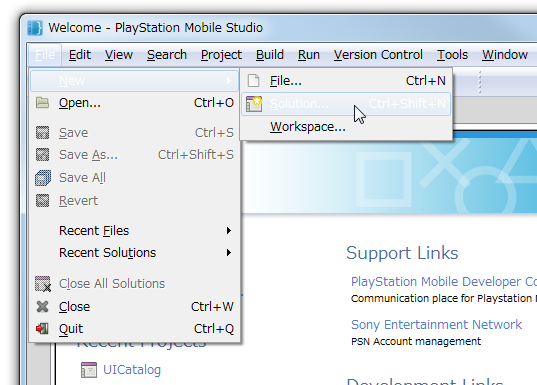
図1 ソリューションの新規作成
[新しいソリューション] ([New Solution]) ダイアログで [C#] - [PlayStation Mobile] - [PlayStation Application] を選択し、任意のプロジェクト名を入力して [OK] を選択して新しい PSM アプリケーションのソリューションを作成してください(図2)。
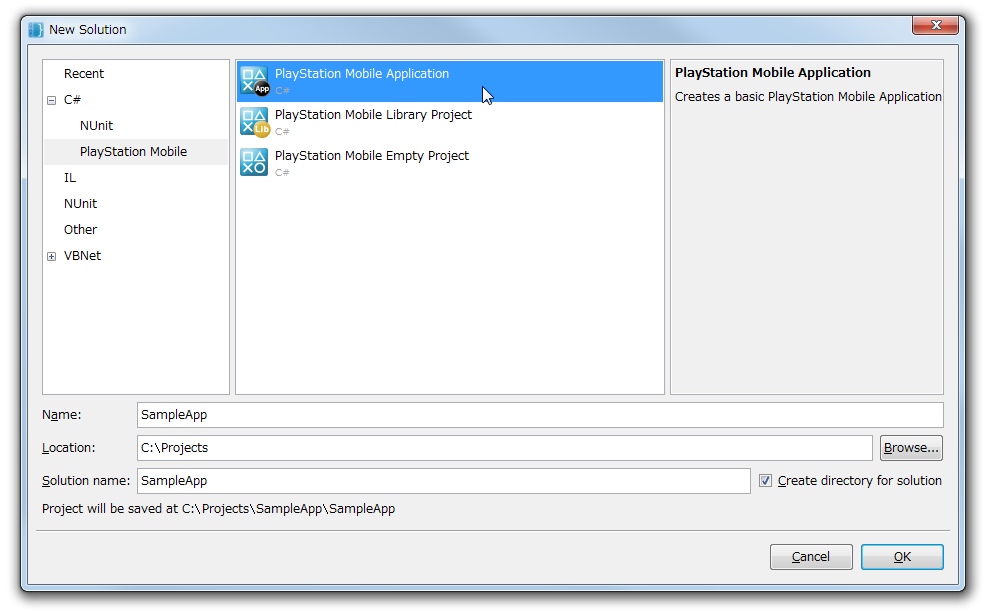
図2 ソリューションの新規作成ダイアログ
次に、参照するアセンブリを追加します。PSM Studio のソリューションパネルの[参照] ([References]) を右クリックし、[参照アセンブリの編集...] ([Edit References...]) を選択してください (図3)。
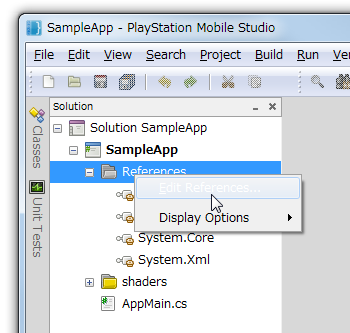
図3 参照するアセンブリの追加
[Edit References] ダイアログで [Packages] タブを選択し、[Sce.PlayStation.Highlevel.UI] のチェックボックスを有効にしてください(図4)。
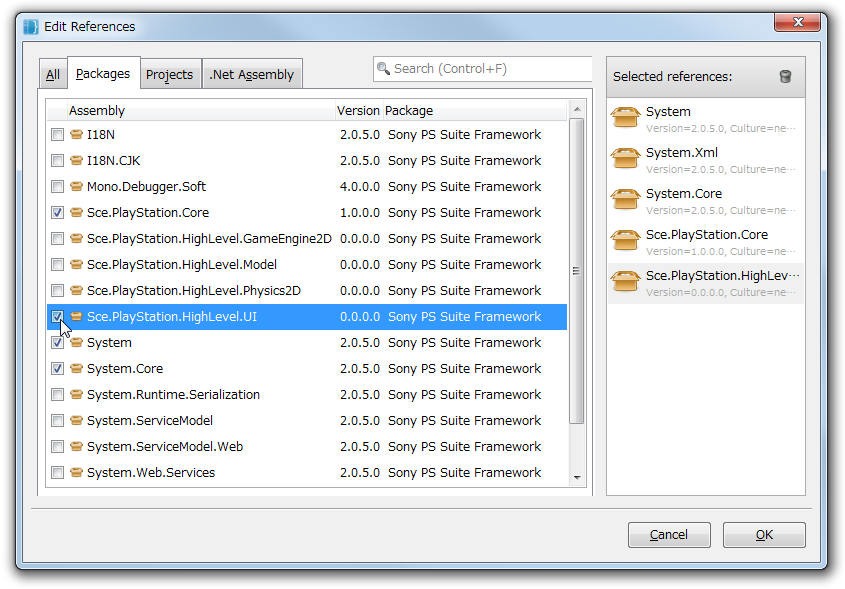
図4 参照するアセンブリを追加した後のソリューション構成
AppMain.cs を開き以下のコードを上書きしてください。
- これが UI Toolkit を使用する最低限のコードになります。
- このコードを適宜カスタマイズして使用してください。
using System;
using System.Collections.Generic;

using Sce.PlayStation.Core;
using Sce.PlayStation.Core.Environment;
using Sce.PlayStation.Core.Graphics;
using Sce.PlayStation.Core.Input;
using Sce.PlayStation.HighLevel.UI;

namespace UIToolkitApp
{
    public class AppMain
    {
        private static GraphicsContext graphics;

        public static void Main (string[] args)
        {
            Initialize ();

            while (true) {
                SystemEvents.CheckEvents ();
                Update ();
                Render ();
            }
        }

        public static void Initialize ()
        {
            // Set up the graphics system
            graphics = new GraphicsContext ();

            // Initialize UI Toolkit
            UISystem.Initialize(graphics);

            // TODO: Create scenes and call UISystem.SetScene
            // Scene myScene = new Sce.PlayStation.HighLevel.UI.Scene();
            // UISystem.SetScene(myScene, null);
        }

        public static void Update ()
        {
            // Query gamepad for current state
            var gamePadData = GamePad.GetData (0);

            // Query touch for current state
            List<TouchData> touchDataList = Touch.GetData (0);

            // Update UI Toolkit
            UISystem.Update(touchDataList);
        }

        public static void Render ()
        {
            // Clear the screen
            graphics.SetClearColor (0.0f, 0.0f, 0.0f, 0.0f);
            graphics.Clear ();

            // Render UI Toolkit
            UISystem.Render ();

            // Present the screen
            graphics.SwapBuffers ();
        }
    }
}
文字列を表示するウィジェットを一つ配置したシーンを作成し、UI Toolkit にそのシーンを設定します。
AppMain.cs を開いてください。main メソッドの最初の方に以下のコメントが記述されています。
// TODO: Create scenes and call UISystem.SetScene
// Scene myScene = new Sce.PlayStation.HighLevel.UI.Scene();
// UISystem.SetScene(myScene, null);
このコメントの部分を以下のように書き換えてください。
// Create scene
Scene scene = new Sce.PlayStation.HighLevel.UI.Scene();
Label label = new Label();
label.X = 10.0f;
label.Y = 50.0f;
label.Text = "Hello World!";
scene.RootWidget.AddChildLast(label);
// Set scene
UISystem.SetScene(scene, null);
AppMain.cs の全体のコードは以下のようになります。
using System;
using System.Collections.Generic;

using Sce.PlayStation.Core;
using Sce.PlayStation.Core.Environment;
using Sce.PlayStation.Core.Graphics;
using Sce.PlayStation.Core.Input;
using Sce.PlayStation.HighLevel.UI;

namespace UIToolkitApp
{
    public class AppMain
    {
        private static GraphicsContext graphics;

        public static void Main (string[] args)
        {
            Initialize ();

            while (true) {
                SystemEvents.CheckEvents ();
                Update ();
                Render ();
            }
        }

        public static void Initialize ()
        {
            // Set up the graphics system
            graphics = new GraphicsContext ();

            // Initialize UI Toolkit
            UISystem.Initialize(graphics);

            // Create scene
            Scene scene = new Sce.PlayStation.HighLevel.UI.Scene();
            Label label = new Label();
            label.X = 10.0f;
            label.Y = 50.0f;
            label.Text = "Hello World!";
            scene.RootWidget.AddChildLast(label);
            // Set scene
            UISystem.SetScene(scene, null);
        }

        public static void Update ()
        {
            // Query gamepad for current state
            var gamePadData = GamePad.GetData (0);

            // Query touch for current state
            List<TouchData> touchDataList = Touch.GetData (0);

            // Update UI Toolkit
            UISystem.Update(touchDataList);
        }

        public static void Render ()
        {
            // Clear the screen
            graphics.SetClearColor (0.0f, 0.0f, 0.0f, 0.0f);
            graphics.Clear ();

            // Render UI Toolkit
            UISystem.Render ();

            // Present the screen
            graphics.SwapBuffers ();
        }
    }
}
作成したコードを PC 上のシミュレータで実行します。
実行方法は 開発環境の設定 の実行とデバッグと同じです。以下の手順に沿って実行またはデバッグ実行を行ってください。
PSM Studio のメインメニューから [ビルド] ([Build]) > [全てビルド] ([Build All]) を選択し、アプリケーションをビルドします。右下のステータスバーでエラーがないことを確認してください。
PSM Studio のメインメニューから [プロジェクト] ([Project]) > [PSM Device Target] が [PlayStation Mobile Simulator] になっていることを確認してください。
PSM Studio のメインメニューから [実行] ([Run]) > [実行] ([Run]) または [デバッグ] ([Debug]) を選択すると、シミュレータで 実行 または デバッグ実行 することができます(図5)。
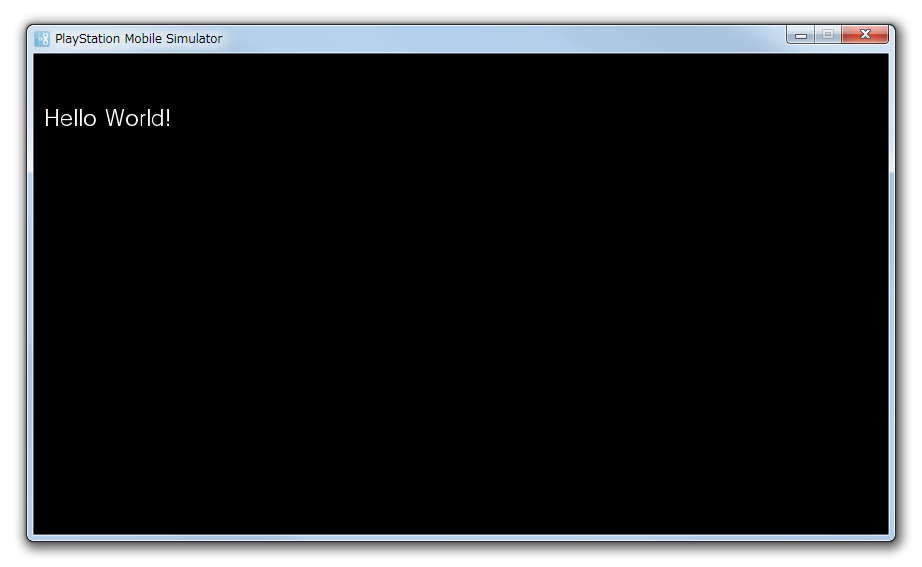
図5 シミュレータ上で実行した様子