


Four classes - Scene, Dialog, Panel and ListPanelItem - can be laid out using the UI Composer.
This chapter explains in order, the kinds of scenarios where these four classes are used (Figure 1).
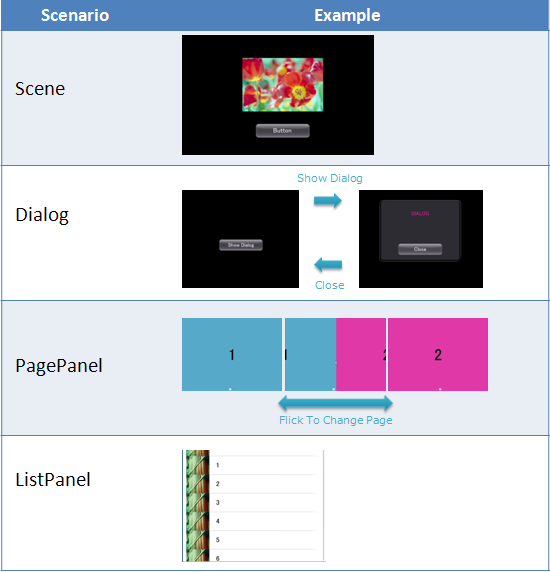
Figure 1 Four Scenarios
This section explains a Scene layout.
Create a simple screen layout by placing an ImageBox and a Button on a Scene (Figure 2).
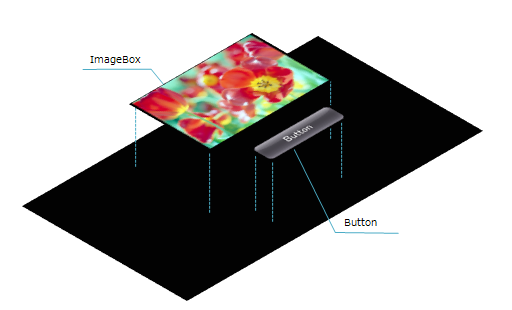
Figure 2 Scene Layout Elements
First, create a new Scene using the UI Composer (Figure 3).
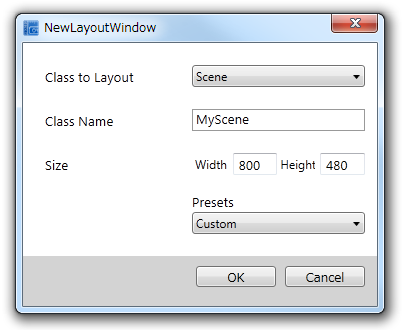
Figure 3 Creating a New Scene
Place an ImageBox and Button on the created Scene (Figure 4).
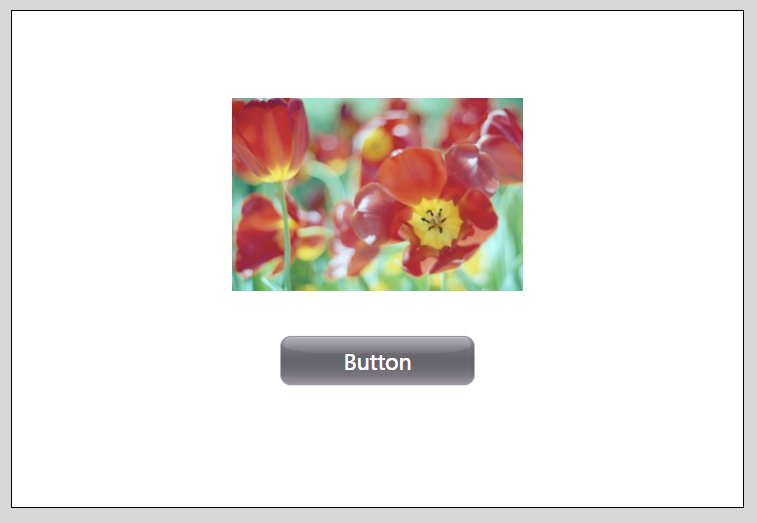
Figure 4 Scene Layout Result
Upon building in this state, the following code will be output.
partial class MyScene
{
    ImageBox ImageBox_1;
    Button Button_1;

    private void InitializeWidget()
    {
        InitializeWidget(LayoutOrientation.Horizontal);
    }

    private void InitializeWidget(LayoutOrientation orientation)
    {
        ImageBox_1 = new ImageBox();
        ImageBox_1.Name = "ImageBox_1";
        Button_1 = new Button();
        Button_1.Name = "Button_1";

        // ImageBox_1
        ImageBox_1.Image = new ImageAsset("/Application/assets/photo05.png");

        // Button_1
        Button_1.TextColor = new UIColor(0f / 255f, 0f / 255f, 0f / 255f, 255f / 255f);
        Button_1.TextFont = new UIFont( FontAlias.System, 25, FontStyle.Regular);
        Button_1.BackgroundColor = new UIColor(255f / 255f, 255f / 255f, 255f / 255f, 255f / 255f);

        // Scene
        this.RootWidget.AddChildLast(ImageBox_1);
        this.RootWidget.AddChildLast(Button_1);

        SetWidgetLayout(orientation);

        UpdateLanguage();
    }

    private LayoutOrientation _currentLayoutOrientation;
    public void SetWidgetLayout(LayoutOrientation orientation)
    {
        switch (orientation)
        {

// --snip--

        default:
            this.DesignWidth = 854;
            this.DesignHeight = 480;

            ImageBox_1.SetPosition(212, 45);
            ImageBox_1.SetSize(429, 286);
            ImageBox_1.Anchors = Anchors.Top | Anchors.Height | Anchors.Left | Anchors.Width;
            ImageBox_1.Visible = true;

            Button_1.SetPosition(319, 374);
            Button_1.SetSize(214, 56);
            Button_1.Anchors = Anchors.Top | Anchors.Height | Anchors.Left | Anchors.Width;
            Button_1.Visible = true;

            break;
        }
        _currentLayoutOrientation = orientation;
    }

// --snip--

}
To use the created layout, write as follows within the Main function of Program.cs.
public class AppMain
{

// --snip--

    public static void Initialize ()
    {
        // Set up the graphics system
        graphics = new GraphicsContext ();

        // Initialize UI Toolkit
        UISystem.Initialize(graphics);

        // Create scene
        var scene = new MyScene();
        // Set scene
        UISystem.SetScene(scene, null);
    }

// --snip--

}
By building and executing in this state, Scene operation on the emulator will be exactly as it has been laid out (Figure 5).
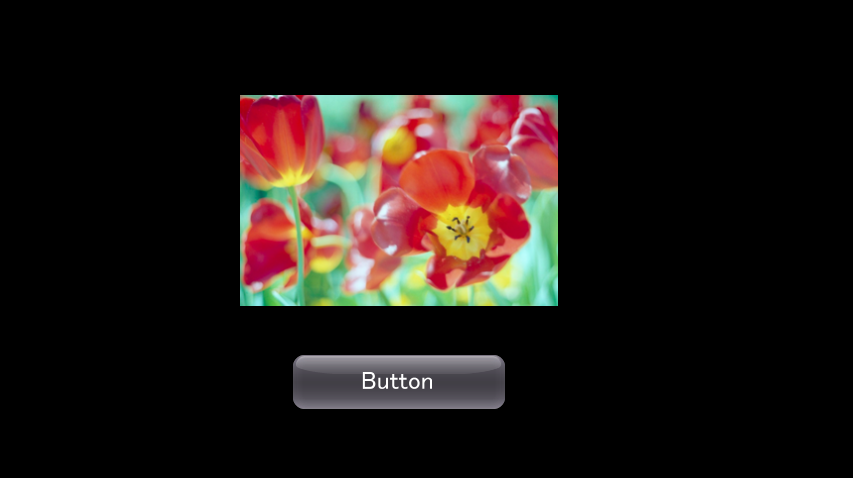
Figure 5 Execution Result on the Emulator
This section explains a Dialog layout and its usage method.
The following is an example of the laid out Dialog being displayed when the Button placed on the Scene is pressed (Figure 6).
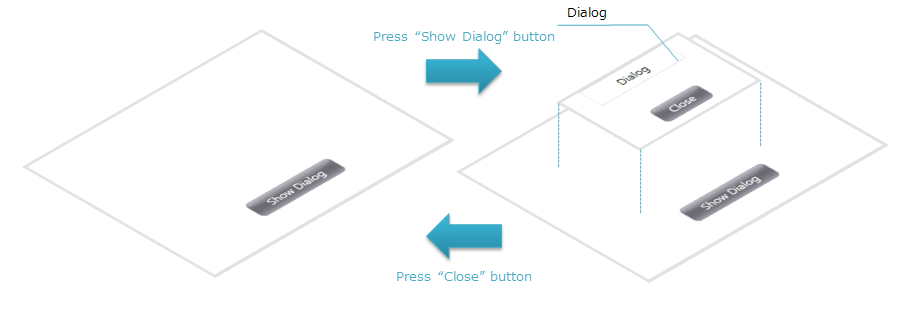
Figure 6 Example of a Dialog Display
In the same manner as the preceding section, create a Scene and a Dialog (Figure 7).
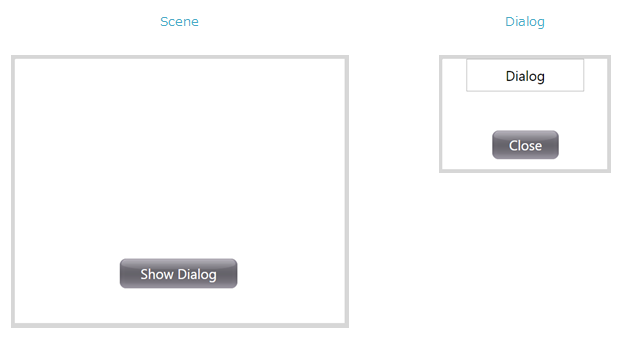
Figure 7 Dialog Layout Result
Write to MyScene.cs as follows so that a Dialog is displayed when the Button placed on MyScene is pressed.
Add MyDialog to MyScene.
public partial class MyScene : Scene
{
    static private MyDialog dialog;

    public MyScene()
    {
        InitializeWidget();

        dialog = new MyDialog();
    }
}
Add an event to display a Dialog to Button_1.
public partial class MyScene : Scene
{
    MyDialog dialog;

    public MyScene()
    {
        InitializeWidget();

        dialog = new MyDialog();

        Button_1.ButtonAction += HandleButton_1ButtonAction;
    }

    void HandleButton_1ButtonAction (object sender, TouchEventArgs e)
    {
        dialog.Show();
    }
}
Register an event for the Button of MyDialog in the same manner.
public partial class MyDialog : Dialog
{
    public MyDialog()
        : base(null, null)
    {
        InitializeWidget();

        Button_1.ButtonAction += HandleButton_1ButtonAction;
    }

    void HandleButton_1ButtonAction (object sender, TouchEventArgs e)
    {
        this.Hide();
    }
}
As in the preceding section, display MyScene and tap on Button to display the Dialog (Figure 8).
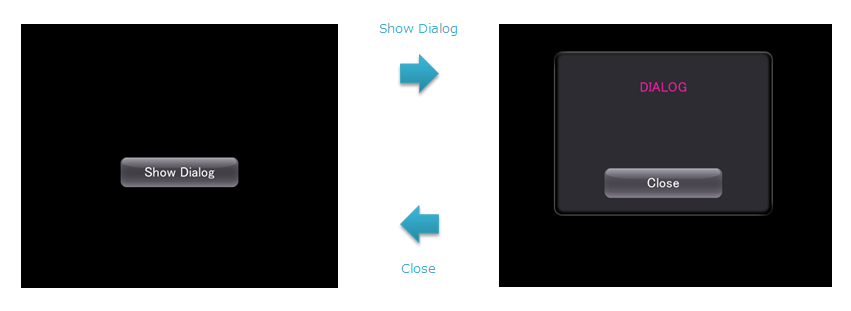
Figure 8 Execution Result on the Emulator
An example to display multiple Panels using PagePanel is explained (Figure 9).
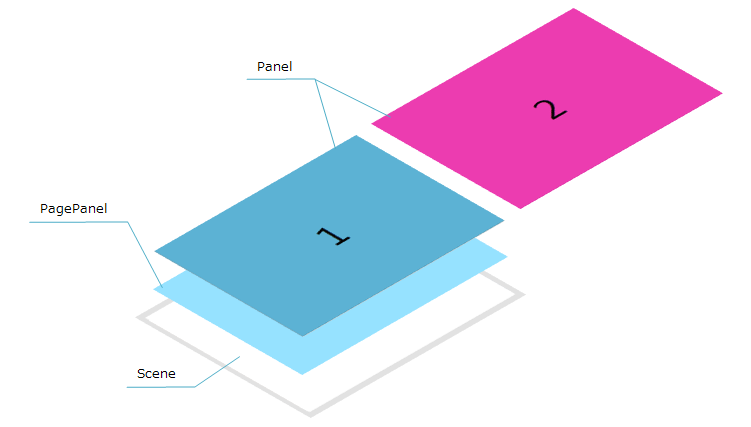
Figure 9 PagePanel Overview
Create MyScene, MyPanel1 and MyPanel2 (Figure 10).
Place PagePanel on MyScene.
Newly-create MyPanel1 and MyPanel2 according to the size of PagePanel (Figure 11).
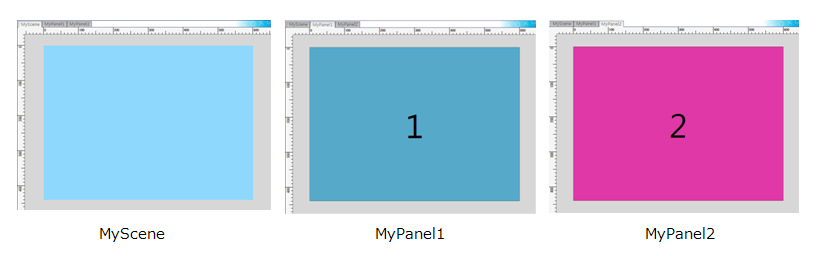
Figure 10 PagePanel Layout Result
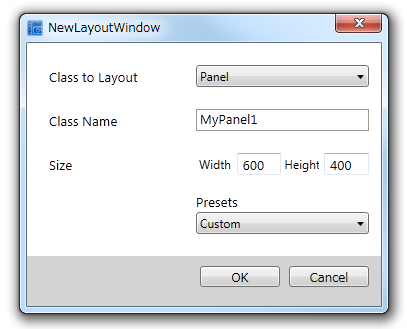
Figure 11 Creating a New Panel
Set MyPanel1 and MyPanel2 to the PagePanel placed on MyScene. Set the Panel created in the PagePanel property window. (Figure 12).
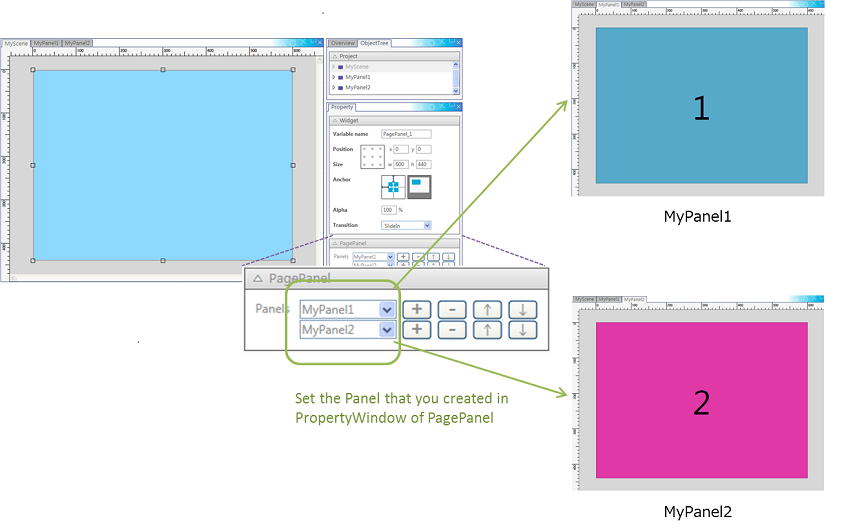
Figure 12 Specifying the Created Panel
MyPanel1 and MyPanel2 to be displayed by PagePanel will be specified by MyScene.composer.cs.
private void InitializeWidget()
{

// --snip--

    // PagePanel_1
    PagePanel_1.AddPageLast(new MyPanel1());
    PagePanel_1.AddPageLast(new MyPanel2());

}
Upon building and executing, the PagePanel will operate as it has been laid out (Figure 13).
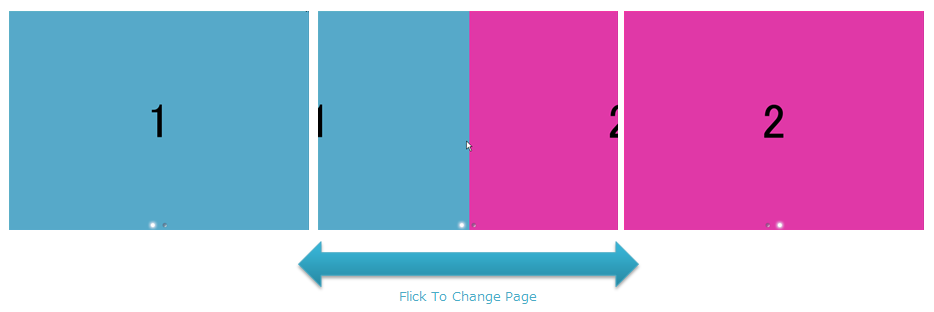
Figure 13 Execution Result on the Emulator
This section explains a List layout and its usage method (Figure 14).
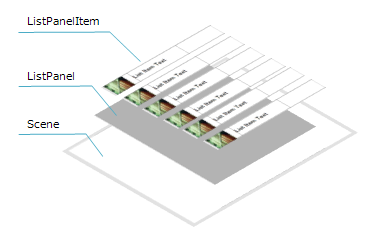
Figure 14 ListPanel Overview
In the same manner as the PagePanel in the preceding section, place ListPanel on MyScene.
Create MyListPanelItem - an element to place on ListPanel (Figure 15).
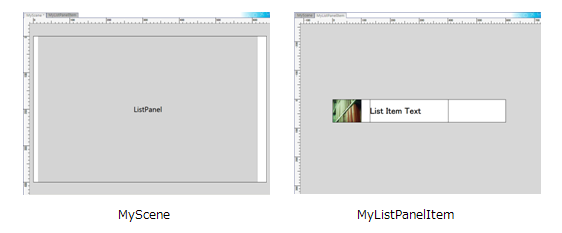
Figure 15 List Layout Result
Set MyListPanelItem created to ListPanel (Figure 16).
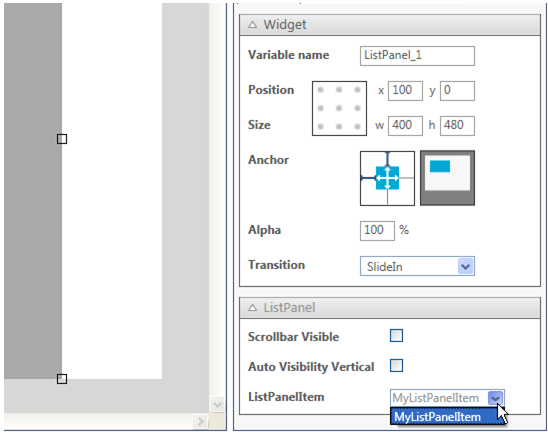
Figure 16 Specifying the Created ListPanelItem
MyListPanelItem to be displayed by ListPanel_1 will be specified by MyScene.composer.cs.
private void InitializeWidget(LayoutOrientation orientation)
{

// --snip--

    // ListPanel_1
    ListPanel_1.ScrollBarVisibility = ScrollBarVisibility.Visible;
    ListPanel_1.SetListItemCreator(MyListPanelItem.Creator);

}
A Creator method will automatically be created for MyListPanelItem.composer.cs.
partial class MyListPanelItem
{

// --snip--

    public static ListPanelItem Creator()
    {
        return new MyListPanelItem();
    }
}
To update MyListPanelItem and to specify the number of item for ListPanel_1, write to MyScene.cs as follows. Add the code to write regarding the MyListPanelItem update content within ListItemUpdater. An example is indicated here to display numbers as a Label string.
public partial class MyScene : Scene
{
    public MyScene()
    {
        InitializeWidget();

        ListPanel_1.SetListItemUpdater(ListItemUpdater);
        ListPanel_1.Sections = new ListSectionCollection { new ListSection("Section", 10) };

    }

    void ListItemUpdater(ListPanelItem item)
    {
        Label label = null;
        foreach (var w in item.Children)
        {
            label = w as Label;
            if (label != null) break;
        }
        if (label != null)
        {
            label.Text = item.Index.ToString();
        }
    }
}
Upon building and executing, the ListPanel will operate as it has been laid out (Figure 17).
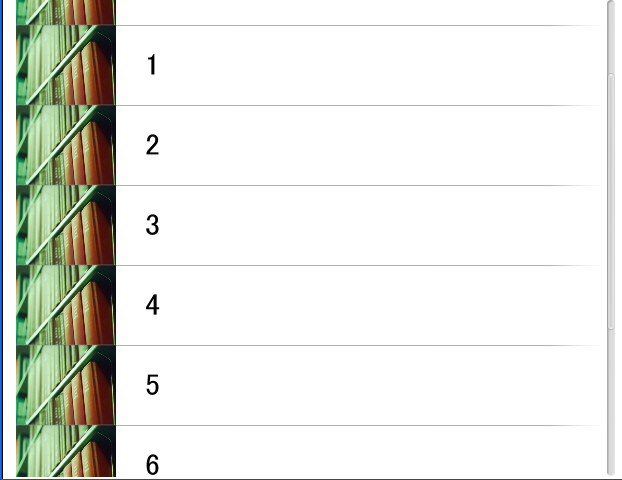
Figure 17 Execution Result on the Emulator