
This document provides an explanation regarding using Publishing Utility.
Contents
The Publishing Utility is a GUI tool for performing a wide range of operations, such as, setting information related to developing, testing, and selling applications; these operations further include editing the application information file (app.xml), managing keys used for developing applications on actual devices, and managing master packages.
Double-click the [Publishing Utility] icon on the Desktop and start the Publishing Utility.

Figure 1 Publishing Utility
Alternatively, right-click app.xml from the PSM Studio and select [Edit with PSM Publishing Utility] (startup by reading app.xml).
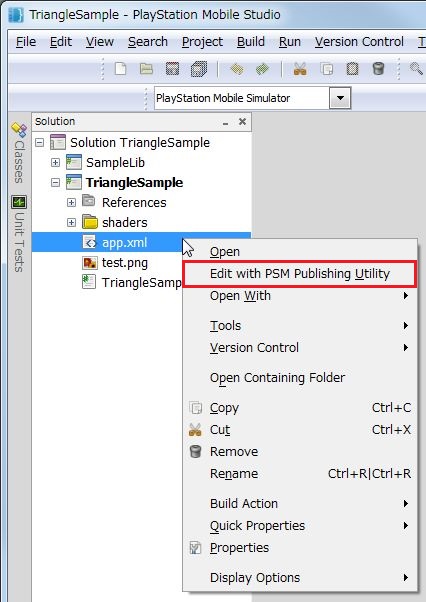
Figure 2 Start Publishing Utility from PSM Studio
The Publishing Utility provides multiple features in three categories.
- Metadata category: sets values of the application information file (app.xml)
- Key Management category: manages keys for running applications on actual devices
- Package & App category: installs to and executes applications on devices
Click on the category button of the category you wish to activate.
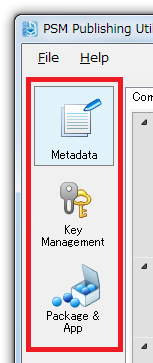
Figure 3 Switching Categories
The features of this category are mainly for editing information required to sell applications.
Open app.xml
The application information is described in app.xml in each PSM project.
To edit the application information, open app.xml from [Menu] - [File] - [Load].
After completing the settings, save by pressing the [Save] button.
Note that app.xml is converted automatically to app.info upon building a project. app.info is the binary version of app.xml and is used upon execution of the application.
Commonly used information is set in the Common Property tab.
Click an item to enter the appropriate value. Explanatory remarks for the item are displayed on the bottom of the window. Use them for reference purposes.
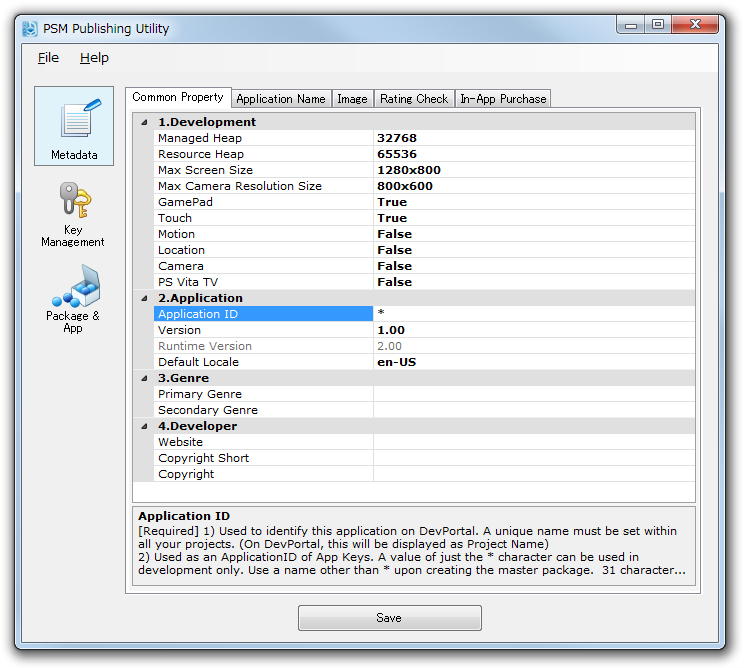
Figure 4 Common Property
Development
The first fields are related to development.
Memory Size Configuration
Item name Overview Value to be set Managed Heap Memory size that can be dynamically allocated within the application Units in KiB. Default value is 32768 (32 MiB) Resource Heap Audio data or image data Memory size to be allocated to textures, etc. Units in KiB. Default value is 65536 (64 MiB) Note: The sum of managed_heap_size and resource_heap_size cannot exceed 96MiB.
Maximum Screen Size
Item name Overview Value to be set Max Screen Size Specify the maximum screen size. When running the PSM application on an actual device with a display resolution higher than the maximum size The screen will be scaled and displayed. 1280x800, 1920x1200 Default is 1280x800 Camera's Maximum Resolution
Item name Overview Value to be set Max Camera Resolution Size Specify the maximum size of the image displayed on the camera's preview screen. 800x600, 2048x1536. Default value is 800x600. Input Device Settings
Item name Overview Value to be set (Used: True; Not Used: False) GamePad Enables/disables the gamepad. Default value is True Touch Enables/disables the touch panel. Default value is True Motion Enables/disables the motion sensor. Default value is False Location Enables/disables the location sensor. Default value is False Camera Enables/disables the camera. Default value is False PS Vita TV Enables/disables PS Vita TV. Default value is False Application
Application ID
The Application ID is used to identify applications.
- Application IDs are used to identify applications registered on DevPortal. Use a string that is easy to identify using the [a-z, A-Z, 0-9, _-] character set.
- Application IDs are also used in relation to content protection. An asterisk (*) can be used as the Application ID during development. (See: Wild Card Feature of the Application ID)
Version
Specify the version of the application. This value should be between 1.00 and 99.99 with two digits after the decimal point. If there is already a version of the application that is sold in the store, the version specified here must be higher. On the other hand, it is not always necessary to increment the version if the application is being resubmitted for master submission after it has been withdrawn during its first submission or if SCE has returned it after evaluation.
Default Locale
Specify the standard language to be used in the store. This will only be used when the end user's setting for the store's display language is not defined on the application side. Select "en-Us" wherever possible.
Genre
Specify the genre by which the application is to be handled in the store. Specification for the Primary genre is required whereas the Secondary genre is optional.
Primary Genre
This is used for categorizing and searching the application in the store.
Secondary Genre
Although this field can be set, it is not currently used. It will be used for searching the application in the store.
Developer
Website
Specify the website which supports the application displayed in the store and the application developers.
Copyright
Specify a UTF-8 text file (maximum size is 64 KiB) with copyright information. Provide information of the developer, and the copyright information that should be displayed. Copyright information related to SCE and PSM SDK will later be added on automatically at the end.
Copyright Short
Enter a one-line copyright note of the development source to be displayed in the store.
Example:
Copyright (C) 2013 Foo Bar Inc. All Rights Reserved.
Use the Application Name tab to set the application name for each applicable language.
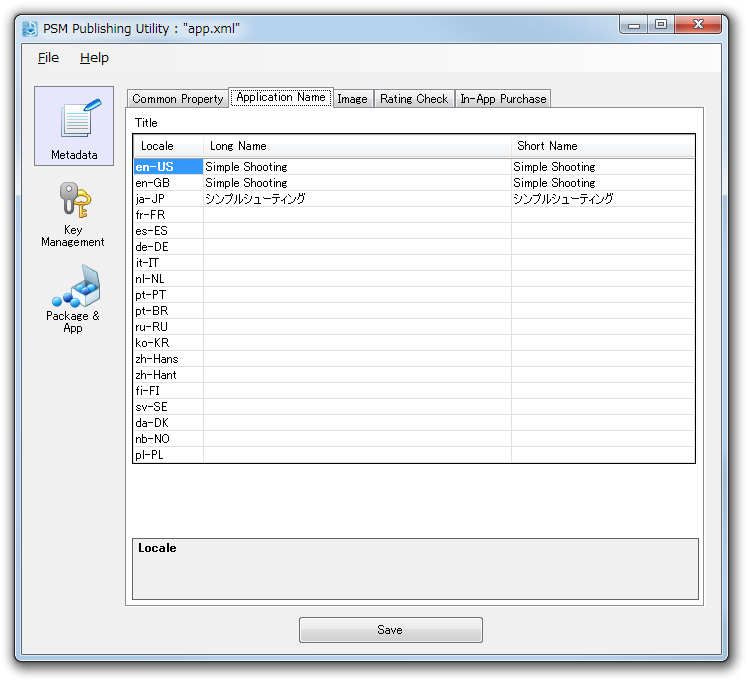
Figure 5 Application Name
Input the Long Name and Short Name for each applicable language.
- Long Name is the formal name of the application. It is displayed, for example, in the store.
- Short Name is the name displayed along with the PSM application icon.
- Long Name and Short Name can be the same.
The abbreviations in Locale correspond to the following languages.
Locale Language en-US English (U.S.) en-GB English (UK) ja-JP Japanese fr-FR French es-ES Spanish de-DE German it-IT Italian nl-NL Dutch pt-PT Portuguese pt-BR Portuguese (Brazil) ru-RU Russian ko-KR Korean zh-Hant Complex Chinese zh-Hans Simplified Chinese fi-FI Finnish sv-SE Swedish da-DK Danish nb-NO Norwegian pl-PL Polish
Specify the image file.
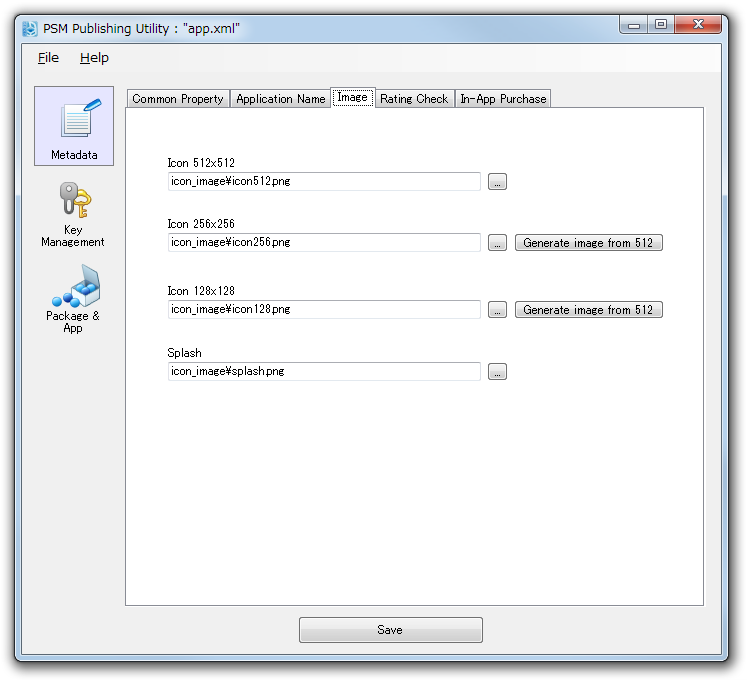
Figure 6 Image
Icon
- For the image file in the Icon field, specify a file in 32-bit full color PNG format. There are three sizes: 512x512, 256x256, and 128x128.
- The image specified for the Icon field will be used for the PSM application icon and for display in the store, etc.
- The alpha values of the PNG format file to be used for the icon must all be 0xFF (opaque).
- Specification for Icon 512x512 is required. Specification for Icon 256x256 and Icon 128x128 is optional. If Icon 256x256 or Icon 128x128 is not specified, the Publishing Utility will create an image reduced from the Icon 512x512 image for usage.
Splash
- For the Splash field, specify a file in 854x480 8-bit Index Color PNG format.
- The image file specified for the Splash field will be displayed in-between tapping the Gate (center button) in a PS Vita's Live Area until the game starts.
Use the Rating Check tab to set the rating of the PSM application.
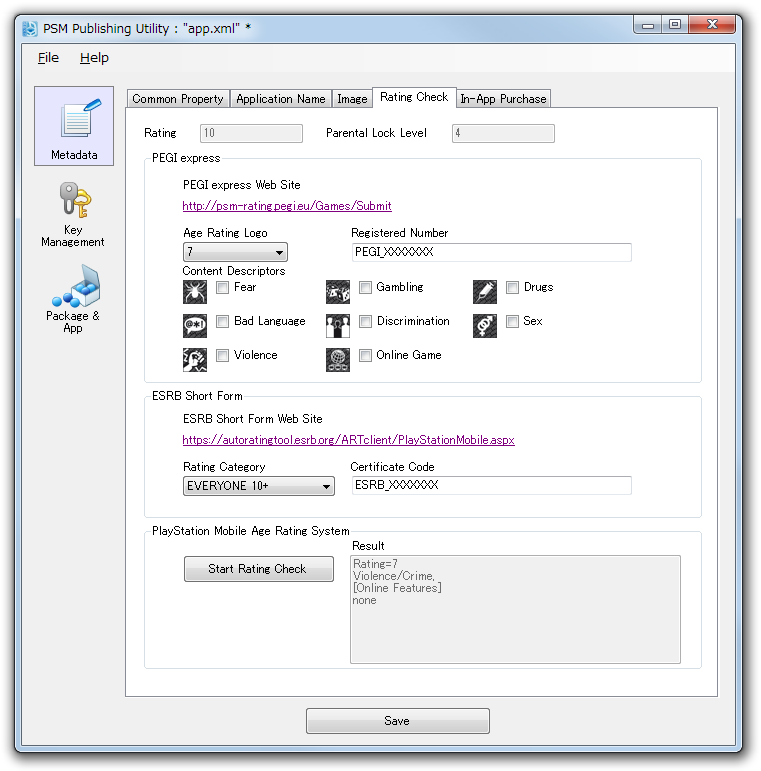
Figure 7 Rating Check
Determine the rating using the following three check tools.
- PEGI Express (Pan European Game Information). European rating.
- ESRB Short Form (Entertainment Software Rating Board). North American rating.
- PlayStation(R)Mobile Age Rating System. SCE Rating System.
If the specified genre for [Common Property] - [3. Genre] is a game, all three of the above rating checks must be performed. If the specified genre is not a game, only perform a rating check using the PlayStation(R)Mobile Age Rating System.
Click the URL or button on the tab, and determine the rating on each site.
The determination result with the highest value from among the three is applied as the rating of that PSM application.
After completing determination, enter the determination results in each field.
Entering the PEGI express rating result
When the rating check is completed using the PEGI express website, the file PEGIlicense_XXX.pdf can be obtained.
This file describes the Age Rating Logo, Registered Number, and Content Descriptors information; enter the values in the fields corresponding to that information.
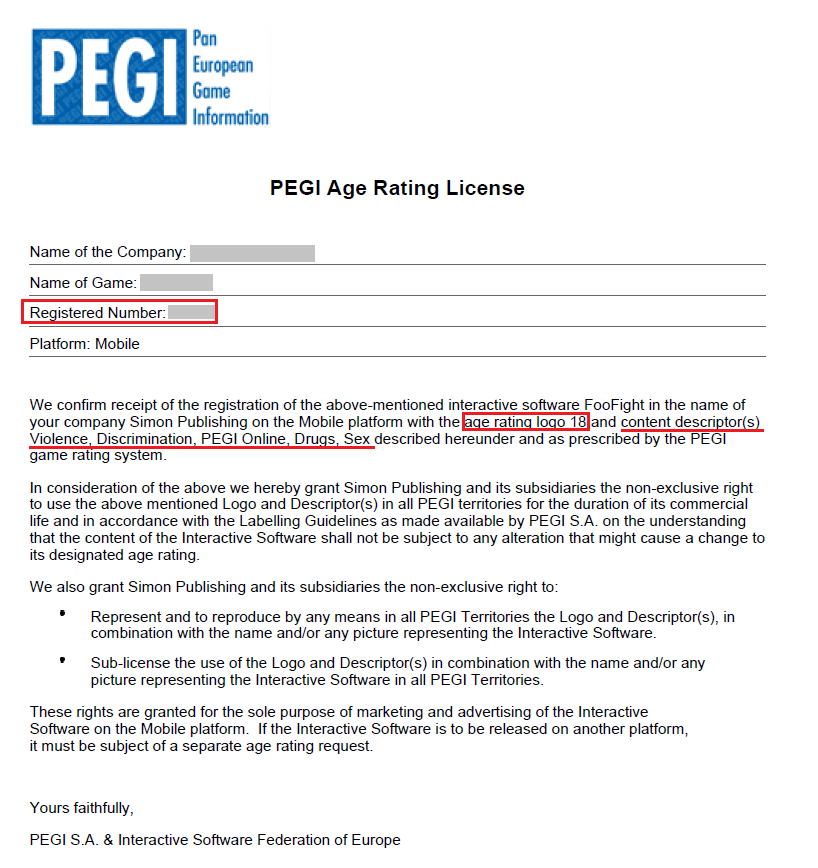
Figure 8 PEGI
Entering the ESRB Short Form rating result
When the rating check is completed using the ESRB Short Form Web site, the file xxx.pdf can be obtained.
This file describes the Rating Category and Certificate Code information; enter the values in the fields corresponding to that information.
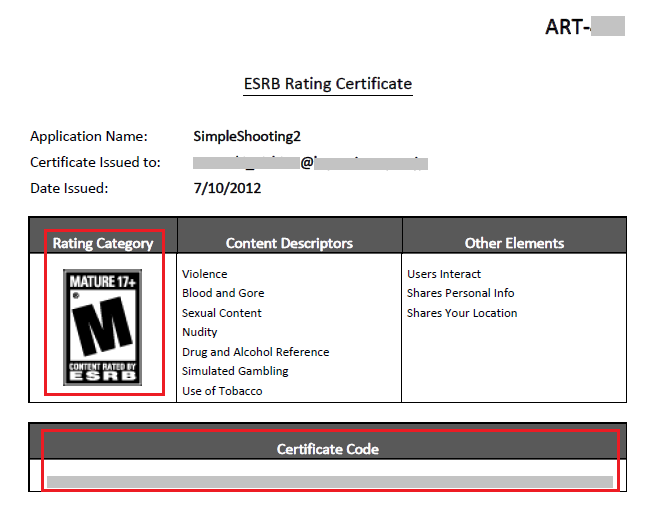
Figure 9 ESRB Short Form
PlayStation(R)Mobile Age Rating System
To perform an SCE Rating System check, click the [Start Rating System] button.
Rating is determined by completing the questions displayed by the wizard.

Figure 10 PlayStatio(R)Mobile Age Rating System
Use the In-App Purchase tab to create and edit product data for In-App Purchase.
Items are defined and the name is each language is set here; price is set separately using the DevPortal.
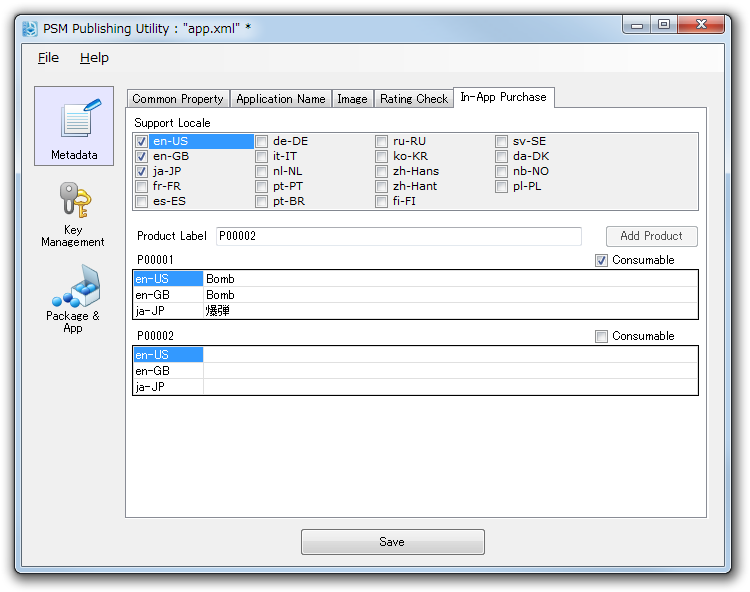
Figure 11 In-App Purchase
- In Support Locale, check the check box for the applicable languages.
- In Product Label, enter the label name of the product.
The following naming restrictions apply to the label name.
- Only numbers and uppercase alphabet letters can be used for the label name.
- The label name is fixed at 6 characters.
- 000000 is reserved and cannot be used.
- If the entered label name meets the restrictions, the [Add Product] button becomes enabled. To add a product, press the button.
- The product is added, so enter the name for each applicable language. For a consumption type product, check the Consumable check box.
Limitations
Note the following when creating a product.
- You can create up to 20 products. You cannot create any more.
- Once the master has been submitted and the product has been officially registered, the product label name cannot be changed or deleted thereafter. When changing or deleting the label name, an error will occur during the data validity check.
- The local name of a product cannot be changed/deleted after the product has been officially registered.
- The local name of a product can be added even after the product has been officially registered.
For details, refer to Creating a Key to Execute a PSM Application on Actual Devices.
In this category, it is possible to install, uninstall, execute, and stop an application package. It is also possible to decompress a package file and to display the application's output text.
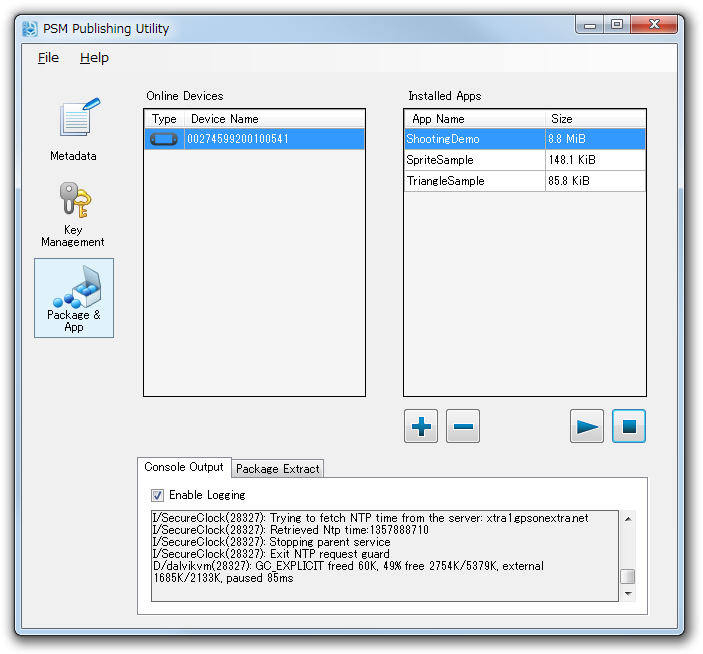
Figure 12 Package & App Category
When selecting a device from the [Online Devices] list at the screen left, the applications installed on that device will be displayed in the [Installed Apps] list at the screen right.

Figure 13 Application Operation Buttons
Install application: installs an application on the device selected in [Online Devices]. The key will also be installed at this time.
Uninstall application: uninstalls the application selected in [Installed Apps] from the device. Note that application data will also be deleted at this time.
Execute application: executes the application selected in [Installed Apps].
Stop application: stops the application running on the device selected in [Online Devices].
Features in the Tab
Console output: when selecting the tab at the bottom of the screen, the text output for the device selected in [Online Devices] will be displayed.
Decompress package: select the tab at the bottom of the screen and drag-and-drop the package (.psmp/.psdp) to the panel at the left side. The package will be decompressed as a directory with the .extracted extension next to the input package.
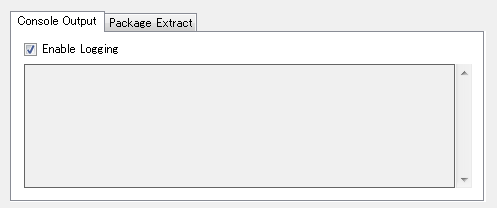
Figure 14 Console Output and Package Extract